Table of Contents
Web MiniDisc Pro guide

Referencing version: Web MiniDisc Pro 1.3.2
Web MiniDisc Pro (WMDpro) is a web app that can copy (almost) any audio file onto a Sony MiniDisc using the NetMD USB protocol. It can also manage tracks, erase discs, and enable new features that extend the MD format. It is a complete replacement for Sony's SonicStage (except Hi-MD modes.)
This guide uses a Sony MZ-N920 Type-S portable with Web MiniDisc Pro on Windows 10 and Microsoft Edge. There are few differences between platforms; we will note them where they exist.
Development and technical background
Web MiniDisc (Pro) is built using netmd-js (a port of the earlier linux-minidisc project to TypeScript), React, and WebUSB.
Cybercase (Stefano Brilli) developed the original version. The current Web MiniDisc Pro fork is developed by asivery. The MiniDisc Wiki hosts Web MiniDisc Pro using Azure Blob Storage and GitHub Actions.
Newer, undocumented features are provided using the netmd-exploits library.
Requirements
- USB cable (most use USB Mini-B)
- Chromium web browser (Google Chrome, Microsoft Edge, Brave, etc.)
A note about Hi-MD devices
- Hi-MD devices can operate in either Hi-MD mode or (normal) MD mode, but only MD mode works properly with Web MiniDisc at present. If you're using a Hi-MD device and having difficulty with installing the driver or Web MiniDisc not finding a compatible device, make sure that an MD-formatted media is inserted prior to connecting the device to your computer. Hi-MD (1GB) discs CANNOT currently be used.
- To format a standard MiniDisc in MD mode, try the following steps:
- Your Hi-MD device should be disconnected from the computer and plugged into a power source sufficient for writing (e.g. the AC adapter).
- Set the Disc Mode setting in the menu on your device to MD. This enables standard MiniDiscs to default into MD mode when recording or formatting. (Please refer to the manual for your device for specific instructions.)
- Reformat your target MiniDisc via the menu on the device. This should format the MiniDisc in MD mode, and the device should indicate it's in MD mode on its display.
- With the MD mode MiniDisc still inserted, you can go ahead and reconnect the device to your computer and continue setting things up!
Windows
Windows requires a driver to be installed before using Web MiniDisc Pro, Platinum-MD, or NetMD Wizard. The driver installation requires Administrator privileges.
Installing Zadig
Zadig is a Windows application that installs generic USB drivers. Web MiniDisc Pro needs generic libusb drivers to connect to the recorder.
These generic drivers cannot co-exist with Sony's official drivers. You must remove these before using Zadig, and remove the libusb drivers before installing Sony drivers for SonicStage.
Install Zadig from here, or use the Chocolatey package manager (“cinst -y zadig”). Because it installs a device driver, you must run Zadig as an Administrator.
Connect the NetMD device, then launch the Zadig application. “Net MD Walkman” (or similar) should be automatically selected in the drop down box. If it isn't shown, select “Options” and then “List all devices”
The “Driver” field will show that the WinUSB driver will be installed.
Click “Install Driver”. A dialog box will appear noting that driver installation may take up to 5 minutes.

Once complete, you can close Zadig. You must repeat this process when using a different device (based on the USB device ID.)
Linux
Packaged browsers
Packaged versions of Chrome or Chromium (such as Snap or Flatpak) will likely not work with Web MiniDisc Pro at all. Use a version of Chromium from your distribution's repositories.
udev rules / device permissions
Regular user accounts do not have the necessary permissions to use MD USB devices on Linux by default and will result in devices not showing up in the chooser or an access denied message. You can use the following steps on most Linux distros to make an exception for your MD device.
1. Run the following command to find your MD device.
sudo lsusb
Example:
ulterior@fuego:~$ sudo lsusb
Bus 003 Device 019: ID 054c:0084 Sony Corp. Net MD
NOTE: If this command doesn't work, you may need to install the usbutils package for your distro.
2. Create a file at /etc/udev/rules.d/50-md.rules with the following contents, taking care to correctly set the vendor and product id sections.
Example:
SUBSYSTEM=="usb", ATTR{idVendor}=="054c", ATTR{idProduct}=="0084", MODE:="0666"
3. Run the following command to make udev aware of the rule change.
sudo udevadm control --reload-rules
4. Run the following command to re-detect devices and apply our change.
sudo udevadm trigger
Mac
Some Mac models (such as the M1 Mac Mini) have reported issues when devices are connected via the USB A ports. A USB-C to USB-A adapter may work better.
The Safari web browser is not currently supported. Use Chrome or Edge instead.
WSL2 on Windows
For those that need or prefer to live in Windows without installing Zadig's utility, WSL2 is a solution that can work with some extra steps. It can certainly be automated/scripted better if used often.
Commands referred to are entered either in a Windows Adminstrator PowerShell window or Ubuntu/WSL2 terminal as directed.
1. Install WSL2 under Windows 10/11. Open a PowerShell prompt under Windows 11 by right-clicking on the Start button and choosing Windows Terminal (Admin). Accept the warning and you'll see the PowerShell window pop up with “Administrator” in the top left.
Next, install WSL by typing the following in the PowerShell window:
wsl --install
Just wait a few minutes and after it's complete, reboot when you're ready.
2. Set up your instance of Ubuntu/WSL2. After a reboot, you'll see terminal window that asks you to set a username and password. These are for the instance of Ubuntu running in the WSL, so they don't need to correlate to your Windows login. Update the packages
sudo apt update
3. Install USB support for WSL2 - this is required for USB devices to be seen within your Ubuntu instance.
In Windows: Download the .msi from here and install it. In Ubuntu/WSL2:
sudo apt install linux-tools-generic hwdata
sudo update-alternatives --install /usr/local/bin/usbip usbip /usr/lib/linux-tools/*-generic/usbip 20
4. Verify your device can be seen in Windows and link it to Ubuntu/WSL2. In Windows:
usbipd wsl list
Note the BUSID (in this case, it's 2-2)
PS C:\Users\YourUserID> usbipd wsl list
BUSID  VID:PID    DEVICE                                                        STATE
1-3    8087:0029  Intel(R) Wireless Bluetooth(R)                                Not attached
1-4    0c45:672c  Integrated Webcam                                             Not attached
2-1    046d:c332  USB Input Device                                              Not attached
2-2    054c:00c9  Net MD Walkman                                                Not attached
Attach it in Windows (replace the busid parameter with yours, in the example above it is 2-2):
usbipd wsl attach --busid <busid>
Now see if it's attached in Ubuntu/WSL.
user@PCname:~$ lsusb
Bus 002 Device 001: ID 1d6b:0003 Linux Foundation 3.0 root hub
Bus 001 Device 002: ID 054c:00c9 Sony Corp. Net MD
Bus 001 Device 001: ID 1d6b:0002 Linux Foundation 2.0 root hub
5. Since it's WSL2, we need to run udev so we can manage the device (important for the next step).
sudo /lib/systemd/systemd-udevd --daemon
6. Follow the Linux instructions listed above. Note your ID output from “lsusb” (in this case, 054c:00c9)
7. Install a chromium-based browser of your choice (I used Google Chrome) and then navigate to Web Minidisc Pro.
8. Push Connect and select your device!
Additional efficiencies and automations may be listed later.
After a reboot, reload you will have to repeat the “attach” (step 4) and udev (step 5) steps above and finally,
sudo udevadm trigger
Launching Web MiniDisc Pro
Insert a MiniDisc into the NetMD recorder and connect it to the computer.
Navigate to Web MiniDisc Pro.
On first visit, or if there has been an update, you will see a changelog window. Quickly check if anything seems relevant to you, then dismiss the box. If the version appears out of date or if you have not used the app in some time, do a cache reload by pressing Ctrl+Shift+R - the hotkey may differ between platforms and operating systems.
Click “Connect”. A popup with “Net MD Walkman” or “Net MD” will appear in the top-left or top-right corner of the browser. If it doesn't, check your cables and try a different one. Select this and click “Connect”

The popup will disappear. The page will show the model name of the NetMD recorder, recording time left (hover over “SP mode” to see record times for LP2 and LP4 formats) and the list of tracks on the disc (including recording mode on the right.)

Managing tracks
Click on a track to select it. The disc title will be replaced with options. After selecting one track, you can select more tracks by clicking them.

Left to right, these options are:
- selection - dash = some tracks are selected; tick = all tracks selected
- record - real-time recording to PC using the line output (see below)
- delete - remove the track from the disc
- group - place sequential tracks in a group (see below) (disabled when non-sequential tracks selected)
- rename - change the title of a track (disabled when multiple tracks selected)
Use the 6 dot “grip” on the left of each track to move them up and down the ToC.
If many options are disabled, the disc may be write-protected. Check the write-protect tab on the disc (open = writable; closed = protected)
Groups
Web MiniDisc Pro supports the MiniDisc's Group feature. Groups are supported by most MiniDisc players, but will still play on older ones.
Groups do not work like playlists. Grouped tracks must be consecutive. Multiple groups are supported, but not nested groups. Groups are often used for separate albums (one group for each) or chapters for audiobooks (one group for each chapter.)
Select the tracks you wish to include in your group. Then select the Group button:

To remove a group, click the trash can icon. The group will be removed but the tracks will remain.
TOC changes such as groups do not save until you press “Stop” and/or disconnect the USB cable.
Full-width characters
Web MiniDisc Pro supports full-width characters, especially Japanese kanji. To enable full-width support in Web MiniDisc Pro, use the Overflow menu and toggle the “Enable full-width title editing” option.

All title editing popups will show two fields:
- half-width characters such as the Latin alphabet and some kana
- full-width characters such as kanji and other kana

Full-width entries use a separate entry that is only shown on a Kanji-capable device (such as a remote) - otherwise the half-width field is shown. MiniDisc uses Shift JIS encoding for titles.
Half-width titles are still shown on low resolution screens (i.e. the on device screen of the MZ-N920) even if the device itself supports full-width remotes.
Recording or downloading tracks
Web MiniDisc Pro has two ways to copy tracks on a MD back to the PC: recording and downloading.
Record
“Recording” plays the track via the 3.5mm output, which you connect to the Mic or Line In on your computer. The device will play the track(s) into your PC, which you record using audio software such as Audacity. See our MD to PC guide.

Download
This requires a Supported NetMD Device.
“Downloading” uses reverse-engineered features in netmd-exploits to copy the ATRAC files from the MD as downloadable files. Not all equipment supports this. To enable downloading, choose “Enable Homebrew mode ripping in main UI” from the Overflow Menu.
Once this is enabled, the “record” option in the app will be replaced with “download” - which will read the selected tracks and download ATRAC or ATRAC3 files via the browser. Also see Converting ATRAC files to other formats if needed.
This feature is experimental and may have errors or issues. Please contact the development team to report bugs.
If you select multiple tracks, all will be played for recording or downloaded. Most browsers will show a warning before downloading multiple files.

Playing tracks
To sample a track while connected to a PC, use the playback buttons at the bottom of the screen.

These buttons control the playback on compatible devices, and are hidden on incompatible ones. The playback comes through the device's own 3.5mm or RCA jack.
Copying audio
Drag MP3, FLAC, WAV, or most other audio files to the web browser window to record them on the MiniDisc.
You can also click the “+” in the bottom right corner (next to the playback controls) to bring up a file selection box.

Upload settings

When you do, a window labelled “Upload Settings” will popup. From here, you can select:
- Recording mode (SP, LP2, LP4)
- The track title on the MD (you can change this later)
- all options except “filename” use track tags such as ID3
- Total and remaining time
- Total shows the time the track(s) will use on the disc, in SP time. Hover to show LP2 and LP4 times
- Remaining shows how much time will be left on the disc after recording. Hover to show LP2 and LP4 times
- Advanced options
- Full width title support - see the section above for more info
- ReplayGain - volume normalization stored inside file metadata
- Normalize tracks - manual volume normalization
- Hide or show tracks. Click show tracks:
- This shows the files to copy, with an options section similar to managing tracks (from left to right):
- plus - add another track to the queue, brings up a file upload dialog box
- minus - remove the selected track from the queue
- T - retitle the track before it is copied
- up / down - move the selected track higher or lower in the queue and ToC
- Use the selection button to choose a track to manage before the queue is copied to disc
- Cancel the operation
- OK to go and copy the tracks to disc as shown in the popup
Recording mode
There are three MD recording modes:
- SP - the MD standard, works on all equipment with the highest quality
- LP2 - double the recording time listed on the disc, only works on equipment after ~2001
- LP4 - quad recording time at a much-reduced quality
SP is recommended for most cases. It is the most compatible and has the best quality. If you only have newer equipment, LP modes also provide acceptable quality for music at LP2 and podcasts at LP4.
As a free / open source project, Web MiniDisc Pro cannot use Sony's SonicStage LP encoder by default and must instead use the free atracdenc encoder. This encoder does not perform as well as the Sony encoder yet.
Remote ATRAC
As of version 1.3.0, Web MiniDisc Pro supports an external ATRAC3 (LP) encoder. External servers can run encoders such as Sony's SonicStage or PSP encoder for ATRAC3 LP, which will then send a higher-quality file for Web MiniDisc Pro to send to your device.
To use an external encoder, use the overflow menu before you connect your equipment to WMDpro:

An ATRAC3 encode server provided by the MiniDisc Wiki is entered by default. Depending on bandwidth constraints, this server may not be available. If it is not, any server that supports atrac-api may be used (with HTTPS.)

SP mode
SP mode does not need any encoder as the ATRAC processing is performed by the recorder. This also means SP mode records much slower than LP modes. See our Speed Test page for examples.
Compared to SonicStage
Interestingly, SonicStage converts all audio to LP2 first before transferring it to a device, even when recording in SP. This means that when recording in SP, the original audio is converted to LP2, then to PCM, which is then sent to the device, and finally encoded by the device in ATRAC1 (SP). As a result, SP mode tracks sound better when recorded with Web MiniDisc, as it doesn't do any redundant encoding. LP mode tracks will sound as good (or better) if using remote ATRAC encoding, but worse if using the default atracdenc.
Diagram
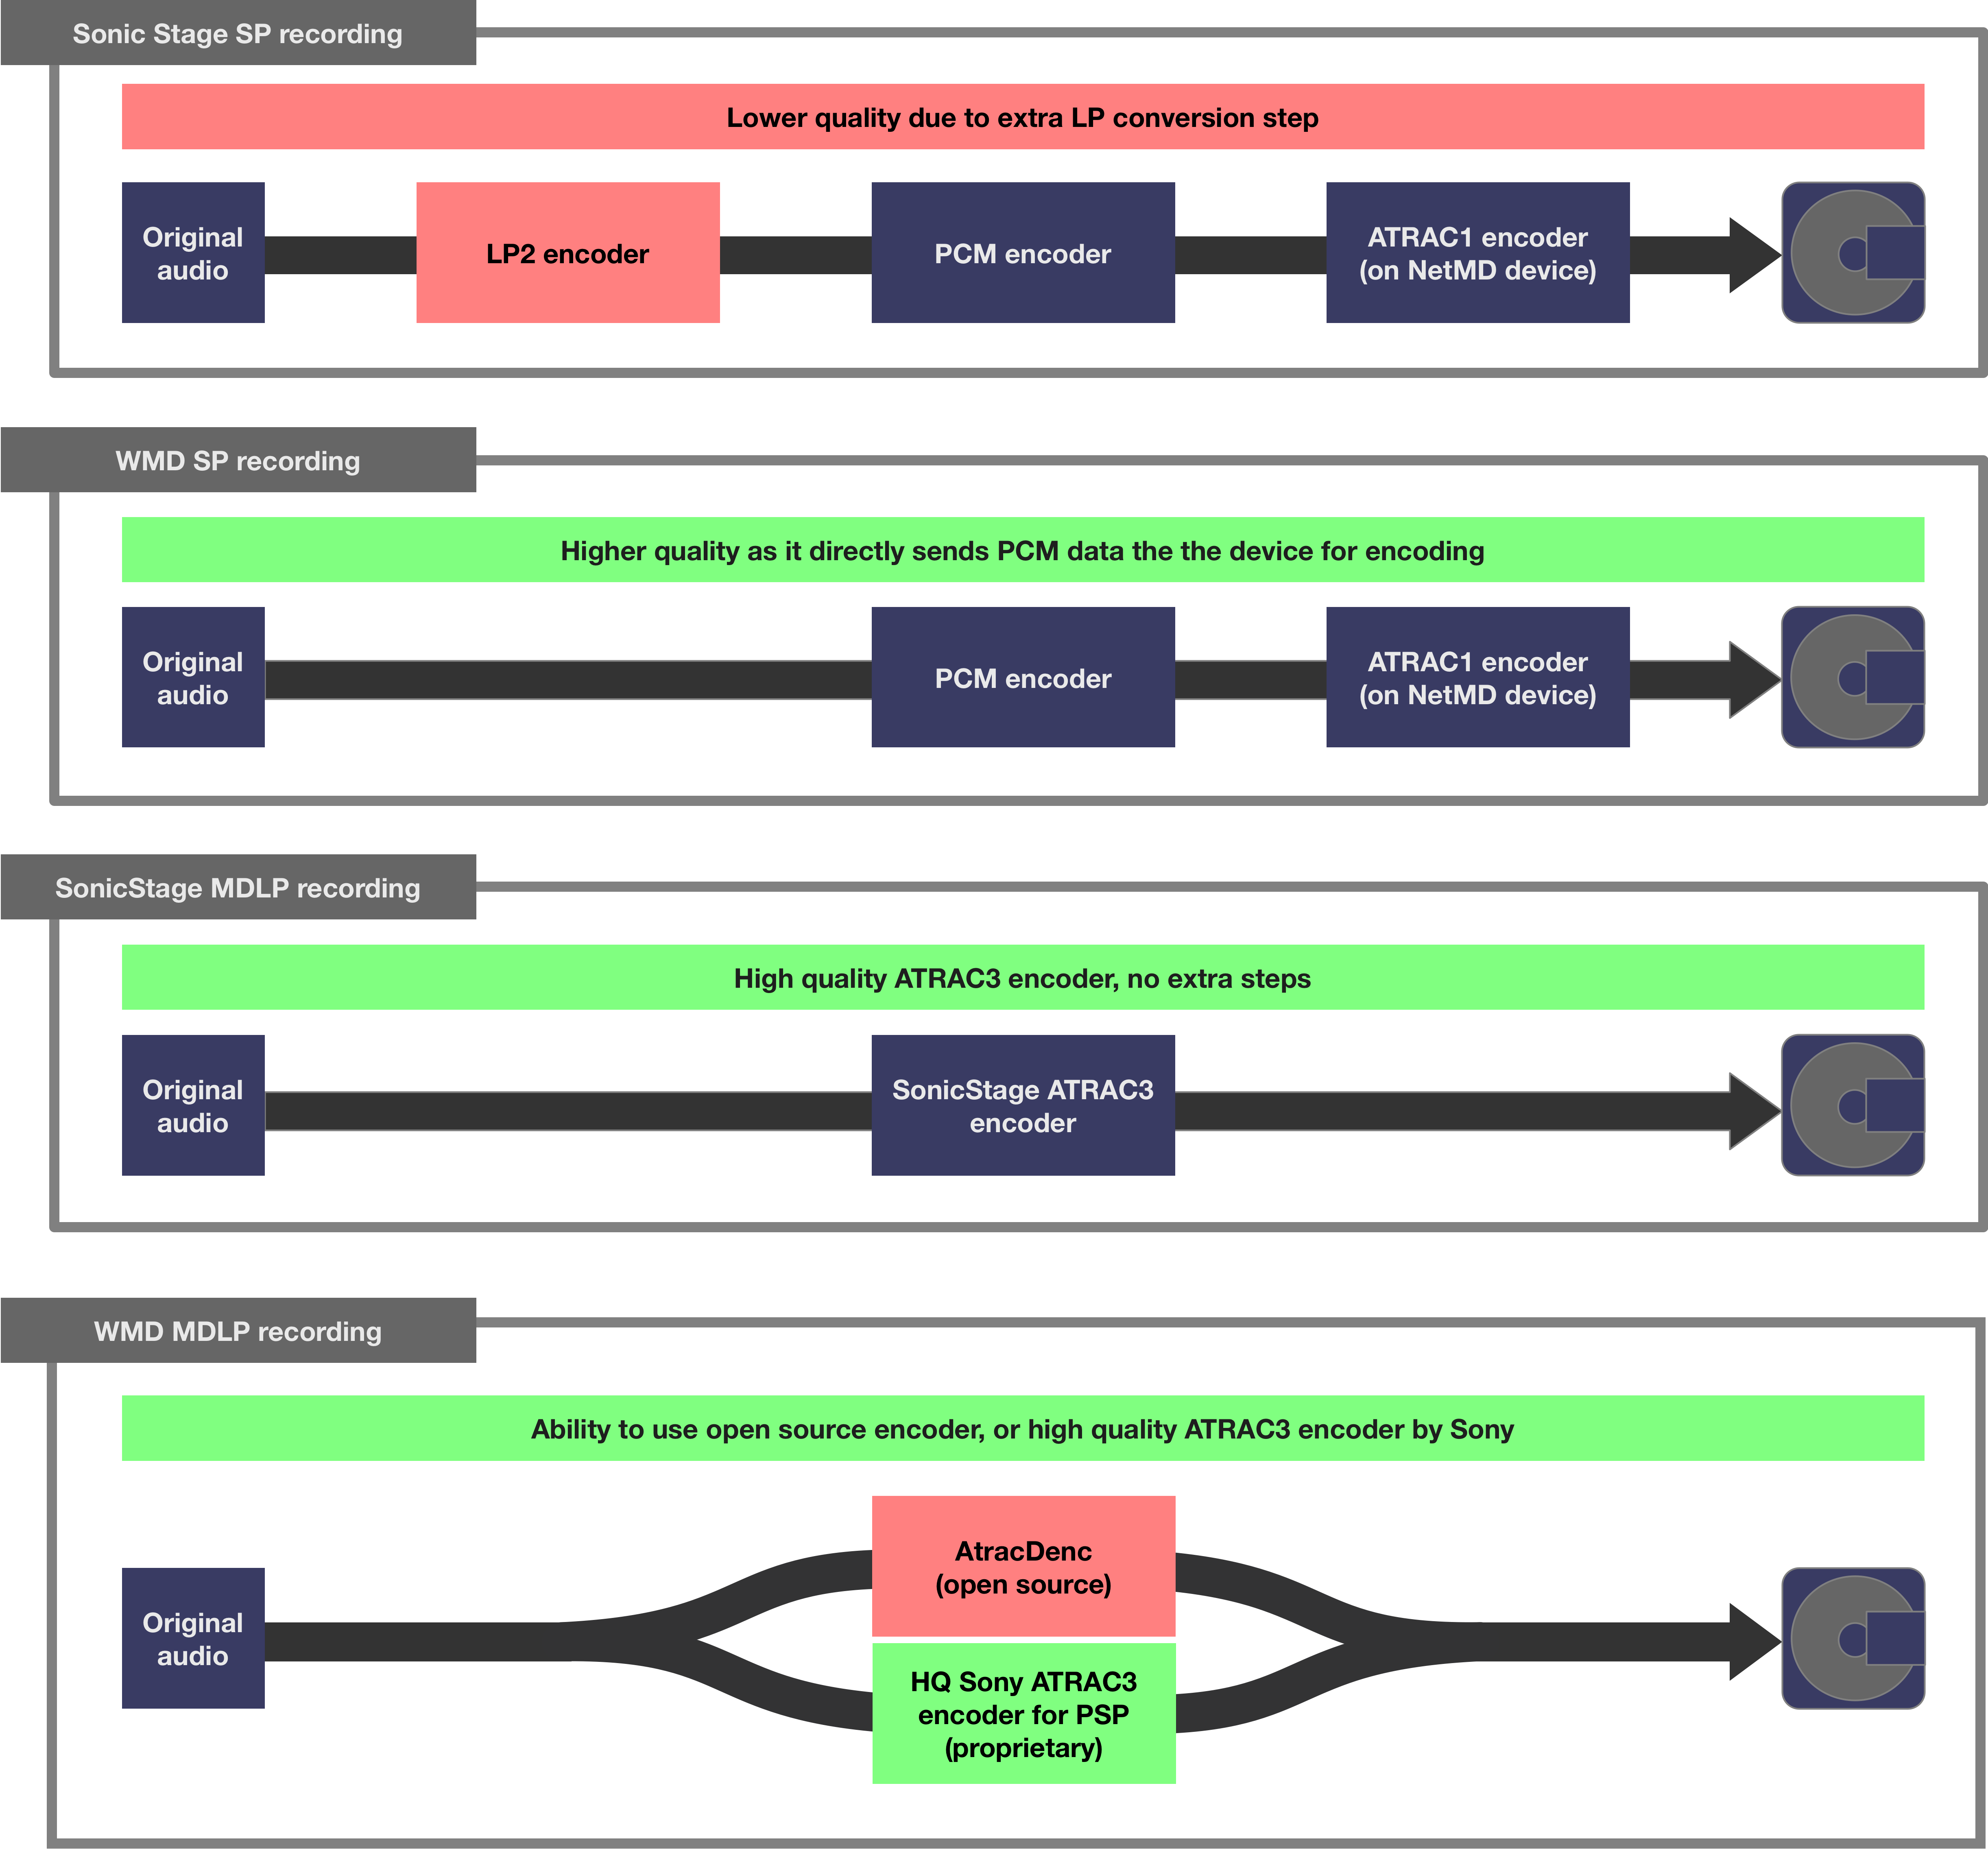
Courtesy of developer Sir68k
Copying to disc
Click OK. A new dialog box will show the progress of the copy. The top bar shows the conversion, which happens on the computer. The lower bar shows the copy to MD.

Recording takes some time, but is faster than audio to audio or optical to audio dubbing. The Speed Test page (linked above) has examples of how long you should expect. Do not move or bump the recorder while you're copying tracks, or while you hear the mechanism moving. Homebrew mode (see below) can increase the copying speed.
Finishing up
The “Notify when done” option will use the browser's notification service to notify you when an upload is complete.
When done, choose “Exit” from the overflow menu. Press the “Stop” button on the recorder, check if the display is flashing a message (“TOC edit” or “PC→MD”) and wait until it stops flashing. Some recorders may even lock the eject switch until you press “Stop” and the ToC writes. Disconnect the NetMD player, and enjoy!
Overflow menu
In the top-right of the app is the overflow (ellipsis) menu. This shows many more features and settings.

- Reload TOC - refresh the list of tracks from the Table of Contents on the disc
- Enter Homebrew Mode - advanced features and options (more below)
- Rename Disc - change the disc title
- Wipe Disc - erase the disc (even if it has “checked-out” audio from SonicStage)
- Song Recognition - identify tracks using Shazam (requires a userscript or ElectronWMD, more below)
- Import titles from CSV - use a CSV file to title tracks
- Export titles to CSV - create a CSV list of titles to import
- Exit - disconnect from Web MiniDisc
- Enable full-width title editing - Japanese kanji characters (more above)
- Homebrew mode ripping in main UI - download audio files from portables (more above)
- Dark mode - light and dark mode toggle
- Retro mode - a Windows 95 interface (does not support all features)
- About - information about the app
- Changelog - recent changes, shows on first visit
- Support and FAQ - cybercase's readme page
- GitHub - asivery's GitHub
Song recognition
As of version 1.3.0, Web MiniDisc Pro has Shazam integration to identify and title tracks using audio fingerprints.
Select “Song Recognition” from the overflow menu. A dialog box will popup.

See the Recording or downloading tracks section above for detail about line-in versus exploits mode.
Song recognition requires either a userscript or the ElectronWMD app, due to CORS website security.
Installing the userscript
Clicking “userscript” from the dialog box will not work without the Tampermonkey browser extension, available in the Chrome and Edge add-on stores. The built-in Chrome userscript engine will not work.
With Tampermonkey installed, click the “userscript” link. A new window will open with detail about the script. Click “install”.

Refresh the page and reconnect the MD recorder.
Recognizing tracks
Select the tracks to be recognized by Shazam. Choose the tite format with the drop-down box in the top right.

Click “recognize” in the bottom right. Web MiniDisc Pro will fetch new track information from Shazam using a snippet of the audio (either from line-in or from homebrew download mode):

Click “Apply new titles” to write the title from the right column to the MiniDisc.

Troubleshooting
Web MiniDisc Pro has been heavily tested, especially on the most common devices. Some issues or errors may still occur.
Browser JavaScript console
When reporting an issue or bug, you may be asked to show the browser console. The console shows information, errors, and progress that is useful for finding issues.
To open the JS console, press Ctrl-Shift-i to open the developer console, then choose “Console”.
Stall or pause while copying
This is usually a battery issue. Writing to a MD is battery-intensive, so it is recommended to use an AC adapter or fresh battery when writing.
1.2V NiMH rechargable batteries may have a shorter life than 1.5V alkaline or lithium disposable batteries.
"Oops, something unexpected happened"
This is a fairly generic error and can mean a number of things have gone wrong with Web MiniDisc's handling of the disc.
Check the power delivery (see above) and try another disc. If it continues, please report the issue to the developers.
"The disc's title seems to be corrupted"
Similar to above, this means that there is an issue reading the ToC on the disc.
Check the power delivery (see above) and try another disc. If it continues, please report the issue to the developers.
Tracks missing once disc is removed
If tracks recorded or ToC changes are missing after reloading or removing the disc, the two most common causes are:
- ToC not being written
- Write head issue
The ToC may not be written correctly if the battery is low or if the device was disconnected while writing the ToC (“PC→MD” or “ToC edit” flashing on screen). In this case, try again with a fresh battery and a different disc. If the issue repeat, see below.
A disc may appear to be written in the recorder's memory but not write to disc. This means that there is an issue with the write head on the recorder. Try recording using the built in audio input (if not a download-only model) to see if all recording has this issue.
If it is a write head issue, check our guides section to see if there is a repair guide.
Cannot connect on MacOS / Linux
Early NetMD equipment such as the MZ-N505 or MZ-N707 can have issues connecting to computers with MacOS or Linux. Windows is not affected.
This is likely due to a bug in the USB firmware of R1.100 devices. There is no fix known.
"Unable to claim interface"
This is a USB error. It likely means that Web MiniDisc Pro cannot take exclusive control of the recorder, due to another application or virtual machine.
Try closing all other programs or restarting the computer.
"Offset is outside the bounds of the DataView"
Likely deck or bookshelf exclusive, this error has been seen on Sony LAM equipment.
Some Mac models (such as the M1 Mac Mini) have reported issues when devices are connected via the USB-A ports. A USB-C to USB-A adapter may work better.
Homebrew mode
This requires a Supported NetMD Device.
Using the overflow menu, you can enable homebrew mode (formerly factory mode.) This mode is experimental and comes with no warranty.
Once you click, there is a warning popup. It is important to read and understand it.
You will see the recorder's firmware version (which is important for reporting issues to developers, and decides which homebrew features are available.)
The homebrew mode screen has three main sections for manipulating the disc ToC: (under construction)
Position sector

Half-width sector

Timestamp sector

Homebrew mode overflow menu

In homebrew mode, the overflow (ellipsis) menu has different options. These are:
- Reload ToC - reloads the disc's Table of Contents
- Edit other ToC values - a popup with advanced ToC options
- Toolbox - additional features
- Strip SCMS information - removes the SCMS flag (digital copy) from a disc
- Archive disc - copies the whole disc at once, including ToC
- Read RAM - for developers, copies the recorder's RAM to the PC
- Read firmware - for developers, copies the recorder's firmware to the PC
- Download TOC - copy the disc's Table of Contents to a file for backup or manipulation
- Upload TOC - replace the disc's ToC with one previously downloaded above
- Enable SP upload speedup - have the recorder copy tracks at faster than 2x speed
- Tetris - a fun proof-of-concept showing how talented the MD hacking scene is
Using Web MiniDisc offline
Electron WMD
Electron WMD is a standalone desktop version of Web MiniDisc Pro by the same developer. It can be found at this GitHub link.
Browser app
Web MiniDisc Pro can also be installed locally as a web app. This means it can be run without an internet connection or opening a web browser.
On Windows with Microsoft Edge, click the “3 blocks and plus” icon next to the Favorites “star” icon:

Choose “install” - the app is now available in your Start or Apps menu.
These directions should apply to Linux or MacOS systems as well.

Web MiniDisc installed as web app on Linux system:

Other projects
Web MiniDisc (Pro) is developed alongside a number of other fantastic MiniDisc projects. Many share code, research, and developers. Here are some: